Blog entries tagged with 'django'

  • PostgreSQL and PostGIS installation from source on Mac OS X Lion

    By Nuno Mariz, on 19 June 2012 @ 11:59

    This is a cookbook for installing PostgreSQL and PostGIS on Mac OS X Lion from source, as alternative you can install the binaries from EnterpriseDB or KyngChaos.

    You don't have to install all packages but if you're using Django will be useful.

    Requirements

    Xcode with "Command Line Tools": Installation via Xcode > Preferences > Downloads.

    PostgreSQL

    1. Create the postgres user via System Preferences(for simplicity), use "postgres" as username.
    2. Compiling and installing PostgreSQL:
      $ curl -O http://ftp.postgresql.org/pub/source/v9.1.3/postgresql-9.1.3.tar.gz
      $ tar xzfp postgresql-9.1.3.tar.gz
      $ cd postgresql-9.1.3
      $ ./configure CC=/usr/bin/clang CXX=/usr/bin/clang++ "CFLAGS=-arch x86_64" "LDFLAGS=-arch x86_64" "CXXFLAGS=-arch x86_64"
      $ make
      $ sudo make install
      $ cd ..
      
    3. Create PostgreSQL Database Cluster:
      $ sudo mkdir /usr/local/pgsql/data
      $ sudo chown postgres /usr/local/pgsql/data
      $ sudo -u postgres /usr/local/pgsql/bin/initdb -D /usr/local/pgsql/data
      
    4. Start PostgreSQL Server:
      $ sudo -u postgres /usr/local/pgsql/bin/pg_ctl -D /usr/local/pgsql/data start
      
    5. After installation add to .profile or .zshrc:
      export PATH=/usr/local/pgsql/bin:$PATH
      

    PROJ4

    PROJ.4 is a library for converting geospatial data to different coordinate reference systems.

    $ curl -O http://download.osgeo.org/proj/proj-4.8.0.tar.gz
    $ curl -O http://download.osgeo.org/proj/proj-datumgrid-1.5.zip
    $ tar xzfp proj-4.8.0.tar.gz
    $ cd proj-4.8.0/nad
    $ unzip ../../proj-datumgrid-1.5.zip
    $ cd ..
    $ ./configure CC=/usr/bin/clang CXX=/usr/bin/clang++ "CFLAGS=-arch x86_64" "LDFLAGS=-arch x86_64" "CXXFLAGS=-arch x86_64"
    $ make
    $ sudo make install
    $ cd ..
    

    GEOS

    GEOS is a C++ library for performing geometric operations.

    $ curl -O http://download.osgeo.org/geos/geos-3.3.3.tar.bz2
    $ tar xjfp geos-3.3.3.tar.bz2
    $ cd geos-3.3.3
    $ ./configure CC=/usr/bin/clang CXX=/usr/bin/clang++ "CFLAGS=-arch x86_64" "LDFLAGS=-arch x86_64" "CXXFLAGS=-arch x86_64"
    $ make
    $ sudo make install
    $ cd ..
    

    GDAL

    GDAL is an open source geospatial library that has support for reading most vector and raster spatial data formats. GEOS and PROJ.4 should be installed prior to building GDAL.

    $ curl -O http://download.osgeo.org/gdal/gdal-1.9.1.tar.gz
    $ tar xzfp gdal-1.9.1.tar.gz
    $ cd gdal-1.9.1
    $ ./configure CC=/usr/bin/clang CXX=/usr/bin/clang++ "CFLAGS=-arch x86_64" "LDFLAGS=-arch x86_64" "CXXFLAGS=-arch x86_64"
    $ make
    $ sudo make install
    $ cd ..
    

    PostGIS

    Spatial extensions for PostgreSQL.

    $ curl -O http://postgis.refractions.net/download/postgis-1.5.4.tar.gz
    $ tar xzfp postgis-1.5.4.tar.gz
    $ cd postgis-1.5.4
    $ ./configure CC=/usr/bin/clang CXX=/usr/bin/clang++ "CFLAGS=-arch x86_64" "LDFLAGS=-arch x86_64" "CXXFLAGS=-arch x86_64"
    $ make
    $ sudo make install
    
  • Getting the client IP address behind a proxy in Apache

    By Nuno Mariz, on 20 May 2009 @ 09:45

    Typically in my Django projects deployments I use Nginx as a front-end web server to handle static content while proxying all other requests to Apache.

    When the request arrives to Apache, the client IP address is 127.0.0.1. We need to configure Apache to accept the IP address from X-Real-IP or X-Forwarded-For headers set by Nginx.

    To solve this problem I use mod_rpaf that does exactly the opposite of mod_proxy_add_forward.

    In my Nginx virtualhost configuration I have something like:

    server {
        ...
        location  / {
            proxy_pass        http://127.0.0.1:8080;
            proxy_set_header  Host             $http_host;
            proxy_set_header  X-Real-IP        $remote_addr;
            proxy_set_header  X-Forwarded-For  $proxy_add_x_forwarded_for;
            ...
        }
        ...
    }
    

    This also applies if your are using a different webserver as front-end such as Lighttpd or another instance of Apache.

  • Portuguese Python User Group

    By Nuno Mariz, on 18 May 2009 @ 08:45
    Python Portugal
    I've created a Python User Group in Portugal. The idea is to join people who enjoy programming in Python.
    No membership is required to participate, experienced programmers and absolute beginners are both welcome!
    You can visit the site or follow us on Twitter.
  • Django 1.0 released!

    By Nuno Mariz, on 4 September 2008 @ 01:23
    Yes, is finally here.
  • Portuguese translation of Django 1.0

    By Nuno Mariz, on 29 August 2008 @ 15:09
    I've just submitted a patch for the Portuguese translation.
    If you are a Django user and know Portuguese, please take a look to the translation strings and submit any fix before the final 1.0 release.
    Meanwhile, you can download the unofficial version in the downloads section.
    Update: The patch is already in SVN.
  • Django 1.0 roadmap and timeline

    By Nuno Mariz, on 12 June 2008 @ 09:38
    Finally we have a Django 1.0 roadmap and timeline. Jacob Kaplan-Moss posted today on Django devolopers.
    I must say this roadmap seems very realistic and the only thing that I will miss is the aggregation support, that is promised to be released in a future version, maybe in 1.1.
  • Internet lifestream with Django

    By Nuno Mariz, on 4 April 2008 @ 01:30
    My goal was to archive and display my internet lifestream. My first approach was writing a client for each API of the social networks that I'm in.
    This turned out to be a complete waste of time and effort. All that I needed after all was a FriendFeed account that would centralize all my feeds.

    Archiving and displaying your entries with Django is quite simple.
    First of all, you need to download the Python FriendFeed API client. Then start a new application in your project, lets call it lifestream:

    ./manage.py startapp lifestream

    On the settings.py add the lifestream project to the INSTALLED_APPS and a variable to store your FriendFeed username:

    FRIENDFEED_USERNAME = 'your_username'

    In the models.py add a model named Entry:

    from django.db import models
    
    class Entry(models.Model):
        id = models.CharField(max_length=255, primary_key=True)
        service_id = models.CharField(max_length=50, null=True, blank=True)
        service_name = models.CharField(max_length=50, null=True, blank=True)
        service_icon = models.URLField(max_length=255, verify_exists=False, null=True, blank=True)
        service_profile = models.URLField(max_length=255, verify_exists=False, null=True, blank=True)
        title = models.CharField(max_length=255, null=True, blank=True)
        link = models.URLField(max_length=255, verify_exists=False, null=True, blank=True)
        updated = models.DateTimeField(null=True, blank=True)
        published = models.DateTimeField(null=True, blank=True)
        media_title = models.CharField(max_length=255, null=True, blank=True)
        media_link = models.URLField(max_length=255, verify_exists=False, null=True, blank=True)
        media_thumbnail = models.URLField(max_length=255, verify_exists=False, null=True, blank=True)
        created = models.DateTimeField(auto_now_add=True)
    
        def __unicode__(self):
            return self.title
    
        class Meta:
            ordering = ['-published']
            verbose_name = 'Entry'
            verbose_name_plural = 'Entries'
    
        class Admin:
            list_display = ['title', 'service_name', 'published']
            list_filter = ['service_name']
            date_hierarchy = 'published'

    Create an url.py on the lifestream folder:

    from django.conf.urls.defaults import *
    from lifestream.models import Entry
     
    entry_list_dict = {
        'queryset' : Entry.objects.all(),
        'paginate_by' : 30,
    }
    
    urlpatterns = patterns('',   
        (r'^$', 'django.views.generic.list_detail.object_list', entry_list_dict),
    )

    As you can see, I've used a generic view. You can also use the date based generic views and pagination to build an archive like mine.

    Add to your project root urls.py:

    (r'^lifestream/', include('lifestream.urls'))

    Create a template lifestream/entry_list.html:

    {% for entry in object_list %}
    <div class="source">
      <a href="{{ entry.service_profile }}" title="{{ entry.service_name }}"><img src="{{ entry.service_icon }}" alt="{{ entry.service_name }}" alt="{{ entry.service_name }}" /></a>
    </div>
    <div class="details">
      <ul>
        <li><a href="{{ entry.link }}">{{ entry.title }}</a></li>
        <li>{{ entry.published|timesince }} ago</li>
        {% if entry.media_thumbnail %}<li><a href="{{ entry.media_link }}"><img src="{{ entry.media_thumbnail }}" alt="{{ entry.media_title }}" /></a></li>{% endif %}
      </ul>
    </div>
    {% endfor %}

    Finally, create a script to synchronize your feeds:

    #!/usr/bin/env python
    # -*- coding: utf-8 -*-
    
    import sys
    import os
    
    ROOT_PATH = os.path.realpath(os.path.dirname(__file__))
    PROJECT_PATH, PROJECT_DIR = os.path.split(ROOT_PATH)
    
    sys.path.insert(0, ROOT_PATH)
    sys.path.insert(1, PROJECT_PATH)
    
    os.environ['DJANGO_SETTINGS_MODULE'] = '%s.settings' % PROJECT_DIR
    
    from friendfeed import FriendFeed
    from django.conf import settings
    from lifestream.models import Entry
    
    ff = FriendFeed()
    feed = ff.fetch_user_feed(settings.FRIENDFEED_USERNAME)
    
    for e in feed.get('entries'):
        entry, created = Entry.objects.get_or_create(id=e.get('id'))
        if created:
            service = e.get('service')
            entry.service_id = service.get('id')
            entry.service_name = service.get('name')
            entry.service_icon = service.get('iconUrl')
            entry.service_profile = service.get('profileUrl')
            entry.title = e.get('title')
            entry.link = e.get('link')
            entry.updated = e.get('updated')
            entry.published = e.get('published')
            media = e.get('media')
            if media:
                entry.media_title = media[0].get('title')
                entry.media_link = media[0].get('player') or entry.link
                thumbnails = media[0].get('thumbnails')
                entry.media_thumbnail = thumbnails[0].get('url')
            entry.save()

    If you want, you can add a job in your crontab:

    # synchronize every 15 mins
    */15 * * * *   root   /path/to/your/application/lifestream_cron.py

    See my lifestream as the working example.

    UPDATE: Friendfeed sends the time in UTC, if you want to use your timezone you have do some hacking:

    Install pytz:

    easy_install pytz

    Import and assign your timezone to a variable:

    import pytz
    tz = pytz.timezone(settings.TIME_ZONE)

    And replace entry.updated and entry.published with:

    updated = e.get('updated')
    updated = updated.replace(tzinfo=pytz.utc).astimezone(tz)
    published = e.get('published')
    published = published.replace(tzinfo=pytz.utc).astimezone(tz)
    if settings.DATABASE_ENGINE == 'mysql': # http://code.djangoproject.com/ticket/5304
        updated = updated.replace(tzinfo=None)
        published = published.replace(tzinfo=None)
    entry.updated = updated
    entry.published = published

    Thanks to Chris Kelly that send me an email reporting this.

  • Django error notification with jabber

    By Nuno Mariz, on 7 March 2008 @ 13:26
    Django has a code error notifications mechanism when a view raises an exception. It will email the people in ADMIN tuple(settings documentation) in settings.py with the full exception information and displays the default 500.html template.
    This only happens when DEBUG=False in the settings.py.

    It's possible to set a handle that change this behavior with a handler500 variable in the root urls.py.
    So, we can easily write a simple view that sends an error notification to our jabber account.

    First of all, you need to install xmpppy and dnspython:

    $ easy_install xmpppy
    $ easy_install dnspython

    Add to settings.py the jabber parameters such as the jabber id, password, recipient, etc.:

    JABBER_ERROR_NOTIFICATION = True
    JABBER_ID = 'your_jabberid@jabberdomain.com'
    JABBER_PASSWORD = 'your_jabber_password'
    JABBER_RECIPIENT = 'recipient@jabberdomain.com'
    JABBER_ERROR_TEXT = 'An error occurred in "Project Name", please check your email.'

    Start a new app named errors or something else and add it to the INSTALLED_APPS tuple in the settings.py:

    python manage.py startapp errors

    Add a handler500 variable with the view in the root urls.py:

    handler500 = 'errors.views.server_error_jabber'

    Finally add the view in errors.views that sends a jabber notification and returns a 500 error page:

    from django.views.defaults import server_error
    from django.conf import settings
    import xmpp, time
    
    def server_error_jabber(request, template_name='500.html'):
       if settings.JABBER_ERROR_NOTIFICATION:
           jid = xmpp.protocol.JID(settings.JABBER_ID)
           cl = xmpp.Client(jid.getDomain(), debug=[])
           conn = cl.connect()
           if conn:
               auth = cl.auth(jid.getNode(), settings.JABBER_PASSWORD, resource=jid.getResource())
               if auth:
                   id = cl.send(xmpp.protocol.Message(settings.JABBER_RECIPIENT, settings.JABBER_ERROR_TEXT))
                   # Some older servers will not send the message if you disconnect immediately after sending
                   time.sleep(1)
       return server_error(request, template_name)
    

    NOTE: Don't forget to set DEBUG=False in the settings.py.
  • Twitter user timeline with a Django templatetag

    By Nuno Mariz, on 11 February 2008 @ 10:45
    Twitter
    A simple templatetag for adding to the template context a variable with the user timeline from Twitter.
    It uses the CachedContextUpdatingNode snippet for caching from Jacob Kaplan-Moss.
    The reason that is necessary to cache content is because Twitter limits the number of accesses to the API.
    This only works if the cache is enabled on your settings.py.
    class TwitterNode(CachedContextUpdatingNode):
    
        cache_timeout = 1800 # 30 Minutes, maybe you want to change this
        
        def __init__(self, username, varname):
            self.username = username
            self.varname = varname
    
        def make_datetime(self, created_at):
            return datetime.fromtimestamp(mktime(strptime(created_at, '%a %b %d %H:%M:%S +0000 %Y')))
    
        def get_cache_key(self, context):
            return 'twitter_user_timeline_cache'
    
        def get_content(self, context):
            try:
                response = urllib.urlopen('http://twitter.com/statuses/user_timeline/%s.json' % self.username).read()
                json = simplejson.loads(response)
            except:
                return {self.varname : None}
            for i in range(len(json)):
                json[i]['created_at'] = self.make_datetime(json[i]['created_at'])
            return {self.varname : json}
        
    @register.tag
    def twitter_user_timeline(parser, token):
        bits = token.contents.split()
        if len(bits) != 4:
            raise TemplateSyntaxError, "twitter_user_timeline tag takes exactly three arguments"
        if bits[2] != 'as':
            raise TemplateSyntaxError, "second argument to twitter_user_timeline tag must be 'as'"
        return TwitterNode(bits[1], bits[3])
    Usage:
    {% twitter_user_timeline username as twitter_entries %}
    {% if twitter_entries %}
      {% for entry in twitter_entries %}
      {{ entry.created_at|date:"d M Y H:i" }} - {{ entry.text }}
      {% endfor %}
    {% endif %}
    Use the source, Luke.
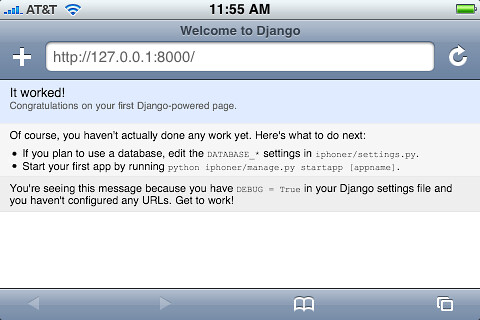
  • iPhone says Welcome to Django

    By Nuno Mariz, on 20 August 2007 @ 20:50
    Django on iPhone

Tags related